by Roger Hare, rhare[at]talk21[dot]com
Last modified: 8 September 2003
Roger Hare's Shogi Pages are brought to you by
![]() the portal to the wonderful
world of Shogi.
the portal to the wonderful
world of Shogi.
|
Chu Shogi by Roger Hare, rhare[at]talk21[dot]com Last modified: 8 September 2003 Roger Hare's Shogi Pages are brought to you by
|
| Contents |
| Introduction to Chu Shogi |


|
|
Chu Shogi equipment is available from G Hodges.
| Chu Shogi - The Board |


|
|
The board looks like this:
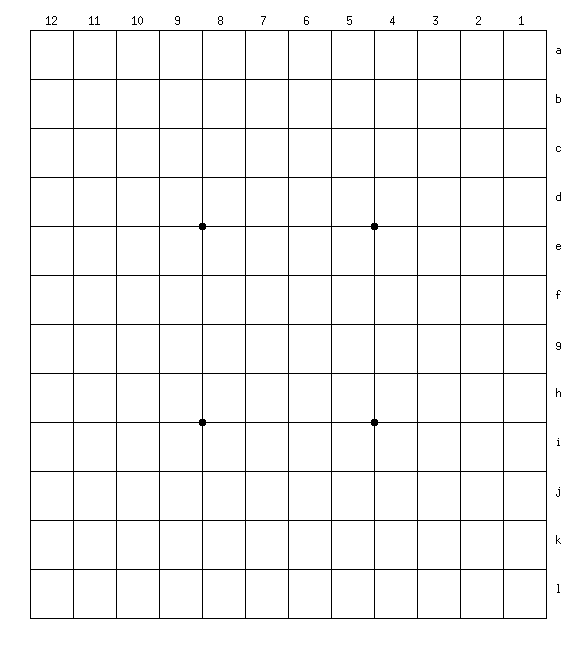
The board is 12 'squares' by 12, but otherwise is the same as a shogi board The circular points are to mark promotion zones and to enable you to visually divide the board up easily. The letters and numbers are for notational purposes - eg: the top right square is a1, the bottom left is l12, and so on. As usual, black plays 'up' the board, and white plays 'down' the board.
| Chu Shogi - The Pieces |


|
|
The diagrams below are scanned in (with permission) from the leaflet describing Chu Shogi which is supplied by G F Hodges. The quality of the scanned images leaves something to be desired, but this is unavoidable due to the resolution of the scanner I am using.
In what follows, the moves of the pieces are described as if the piece were 'black', ie: playing 'up' the board. To get the move for the white move, simply rotate all directions (and the piece!) through 180 degrees.
There are 3 types of piece: Step movers, Ranging movers and Jumping movers.
A circle meanst that the piece can move to the square so marked (step
mover).
An arrow means the piece may move any number of squares in that
direction (ranging mover).
A cross means that the piece may move to that square, jumping other
pieces if necessary (jumping mover).
| Kakugyo (Bishop) |
The kakugyo and its move look like this:

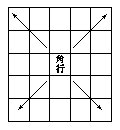
The kakugyo moves any number of squares in a diagonal direction. Initially, each side has two kakugyo. Black's kakugyo are sited at k10 & k3, white's kakugyo at b10 & b3. The kakugyo promotes to Dragon Horse.
| The Moko (Blind Tiger) |
The moko and its move look like this:


The moko moves one square in any direction except n. Initially, each side has two moko. Black's moko are situated at k8 & k5, white's moko at b8 & b5. The moko promotes to Flying Stag.
| The Dosho (Copper General) |


The dosho moves one square in a n-w, n, n-e or s direction. Initially, each side has two dosho. Black's dosho are situated at l10 & l3, white's dosho at a10 & a3. The dosho promotes to Side Mover.
| The Ryume (Dragon Horse) |
The ryume and its move look like this:

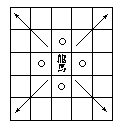
The ryume may move any number of squares in a diagonal direction, plus one square orthogonally. Initially, each side has two ryume. Black's ryume are situated at j9 & j4, white's ryume at c9 & c4. The ryume promotes to Horned Falcon.
| The Ryuo (Dragon King) |
The ryuo and its move look like this:

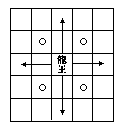
The ryuo may move any number of squares in an orthogonal direction, plus one square diagonally. Initially, each side has two ryuo. Black's ryuo are sited at j8 & j5, white's ryuo at c8 & c4. The ryuo promotes to Soaring Eagle.
| The Suizo (Drunk Elephant) |
The suizo and its move look like this:


The suizo moves a single square in any direction except s. Initially, each side has a single suizo. Black's suizo is situated at l6, white's at a7. The suizo promotes to Crown Prince.
| The Mohyo (Ferocious Leopard) |
The mohyo and its move look like this:


The mohyo moves one square in any of the forward or backwards directions, that is, n-w, n, n-e, s-w, s, s-e. Initially, each side has two mohyo. Black's mohyo are situated at l11 & l2, white's at a11 & a2. The mohyo promotes to Bishop.
| The Hon'o (Free King |
The hon'o and its move look like this:

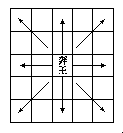
The hon'o noves any number of squares in any orthogonal or diagonal direction. Initially, each side has one hon'o. Black's hon'o is situated at j6, white's at c7. The hon'o does not promote.
| The Chunin (Go-between) |
The chunin and its move look like this:


The chunin moves one square orthogonally forwards or backwards, ie: n or s. Initially, each side hs two chunin. Black's chunin are situated at h9 & h4, white's at e9 & e4. The chunin promotes to Drunk Elephant.
| The Kinsho (Gold General) |
The kinsho and its move look like this:


The kinsho moves one square in any direction except the two backwards diagonals, ie: 1 square in a n-w, n, n-e, e, s, w direction. Initially, each side has two kinsho. Black's kinsho are situated at l8 & l5, white's at a8 & a5. The kinsho promotes to Rook.
| The Osho (King) |
The osho and its move look like this:
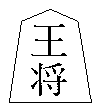

The osho moves one square in any direction. Each side has one osho. Black's osho is situated at l7, white's at a6. The osho does not promote.
| The Kirin (Kylin) |
The kirin and its move look like this:

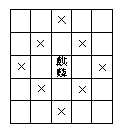
The kirin may move (jumping if necessary) two squares in an orthogonal direction (n, s, e, w) or one square in a diagonal direction (n-w, n-e, s-e, s-w). Initially, each side has one kirin. Black's kirin is located at k7, white's at b6. The kirin promotes to Lion.
| The Kyosha (Lance) |
The kyosha and its move look like this:


The kyosha may move any number of squares in a forwward (ie: n) direction. Initially, each side has two kyosha. Black's kyosha are located at l1 & l12, white's at a1 & a12. The kyosha promotes to White Horse.
| The Shishi (Lion) |
The shishi and its move look like this:

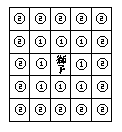
Each side has one shishi. Black's shishi is located at j7, white's at c6. Each side has one shishi. Black's shishi is located at j7, white's at i6. The shishi does not promote.
The shishis move is complicated!
Information relating to capture of a shishi (from Adrian King):
shishi capture restrictions are as follows:
| The Fuhyo (Pawn) |
The fuhyo and its move look like this:


The fuhyo may move one square forward (ie: n). Initially, each side has 12 fuhyo. Black's fuhyo are located at i1-i12, white's at d1-d12. The fuhyo promotes to gold general.
| The Hoo (Phoenix) |
The hoo and its move look like this:

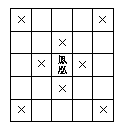
The hoo may move one square orthogonally (n, s, e, w) or two squares diagonally (jumping if necessary). Each side has one hoo. Black's hoo is located at at k6, white's at b7. The hoo promotes to Free King.
| The Hansha (Reverse Chariot) |
The hansha and its move look like this:


The hansha may move any number of squares orthogonally forward or backward (ie: n or s). Each side has two hansha. Black's hansha are located at k1 & k12, white's at b1 & b12. The hansha promotes to Whale. The hansha was once known as hensha.
| The Hisha (Rook) |
The hisha and its move look like this:

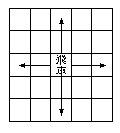
The hisha may move any number of squares in an orthogonal direction (ie: n, s, e, w). Each side has two hisha. Black's hisha are located at j3 & j10, white's at c3 & c10. The hisha promotes to Dragon King.
| The Ogyo (Side Mover) |
The ogyo and its move look like this:


The ogyo may move one square forwards or backwards (n, s) or any number of squares sideways (e, w). Each side has two ogyo. Black's ogyo are located at j1 & j12, white's at c1 & c12. The ogyo promotes to Free Boar.
| The Ginsho (Silver General) |
The ginsho and its move look like this:


The ginsho may move one square diagonally or orthogonally forwards or one squere diagomnally backwards, ie: n-w, n, n-e, s-e, sw. Each side has two ginsho. Black's ginsho are located at l4 & l9, white's at a4 & a9. The ginsho promotes to Vertical Mover.
| The Kengyo (Vertical Mover) |
The kengyo and its move look like this:


The kengyo may move any number of squares orthogonally forwards or backwards (n or s) or one square orthogonally sideways (w or e). Each side has two kengyo. Black's kengyo are situated at j2 & j11, white's at b2 & b11. The kengyo promotes to Flying Ox. The kengyo was once known as Jugyo.
| The Taishi (Crown Prince) |
The taishi and its move look like this:


The taishi may move one square in any direction (n, n-e, e, s-e, s, s-w, w, n-w). The taishi is a promoted Drunk Elephant.
| The Hiroku (Flying Stag) |
The hiroku and its move look like this:


The hiroku mau move any number of squares orthogonally forwards or backwards (n or s), or one square diagonally backwards or forwards (n-e, s-e, s-w or n-w), or one square orthogonally sideways (w or e). The hiroku is a promoted Blind Tiger.
| The Higyu (Flying Ox) |
The higyu and its move look like this:

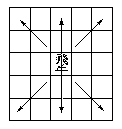
The higyu may move any number of squares diagonally or orthogonally backwards or forwards. The higyu is a promoted Vertical Mover.
| The Honcho (Free Boar) |
The honcho and its move look like this:

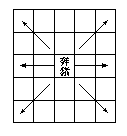
The honcho may move any number of squares diagonally forwards or backwards or orthogonally sideways. The honcho is a promoted Side Mover.
| The Kakuo (Horned Falcon) |
The kakuo and its move look like this:

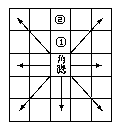
The kakuo may move any number of squares in any diagoonal or orthogonal direction except forwards. Orthogonally forwards, it may move to (2) with a jump or to (1). The kakuo is a promoted Dragon Horse.
Additional information from Koichi Inoue:
The kakuo may also capture a piece on a (1) square, and then
return to its original square (igui).
The kakuo may also capture a piece on a (1) square, and then
move to a (2) square, also capturing - ie: capturint 2 pieces at
one move.
| The Tokin (Promoted Pawn) |
The tokin and its move look like this:


The tokin moves one square in any direction except the two backwards diagonals, ie: 1 square in a n-w, n, n-e, e, s, w direction. The tokin is a promoted pawn.
| The Hiju (Soaring Eagle) |
The hiju and its move look like this:

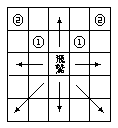
The hiju may move any number of squares orthogonally sideways or forwards (n, s, e or w), or diagonally backwards (s-e or s-w), or diagonally forward (n-w or n-e) to a(1) square or a (2) square with a jump. The hiju is a promoted Dragon King.
Additional information from Koichi Inoue:
The hiju may also capture a piece on a (1) square, and then
return to its original square (igui).
The hiju may also capture a piece on a (1) square, and then
move to a (2) square, also capturing - ie: capturing 2 pieces at
one move.
| The Keigei (Whale) |
The keigei and its move look like this:

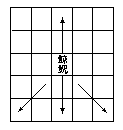
The keigei may move any number of squares orthogonally backwards or forwards (n or s), or diagonally backwards (s-e or s-w). The keigei is a promoted Reverse Chariot.
| The Hakku (White Horse) |
The hakku and its move look like this:

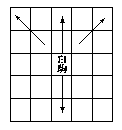
The hakku may move any number of squares orthogonally backwards or forwards (n or s), or diagonally forwards (n-e or n-w). The hakku is a promoted Lance.
| Chu Shogi - The Starting Set-Up and Notation |


|
|
The diagram below was scanned in (with permission) from the leaflet describing Chu Shogi which is supplied by G F Hodges.
At the start of play, the board is set up like this:
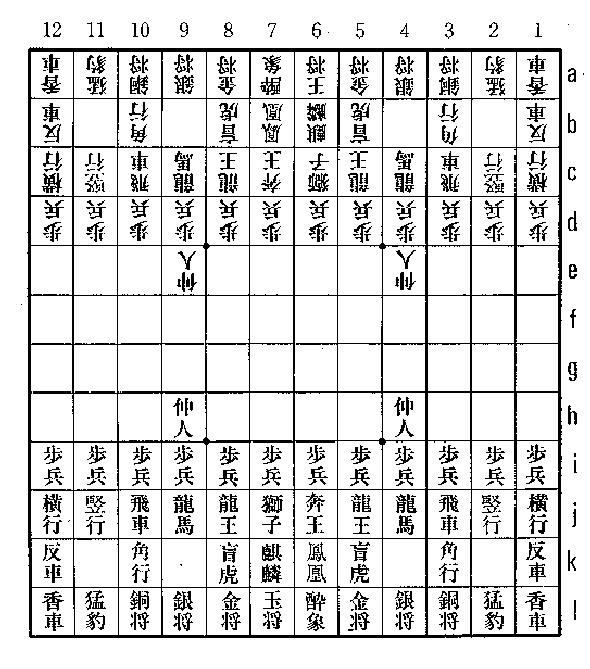
Notation
Chu shogi notation is the same algebraic form as that of shogi.
| Chu Shogi - The Rules |


|
|
Chu-shogi rules are the same as for normal Shogi with the following exceptions:
There are other ways of deciding the game, including:
You can capture all of your opponent's pieces except his King.
The old texts say that a kinsho and osho against a bare osho wins. This is taken to mean that a bare osho loses because it is impossible to have less than a kinsho (all pieces promote to at least a kinsho or better or have higher initial power anyway) and it is not necessary to play out the sometimes difficult ending.